ChenJiancan'Blog


  • Home

  • About

  • Tags

  • Categories

  • Archives

python 并发编程——Futures

Posted on 2018-08-15 | In python , 并发

本篇日志记录python3 标准库中并发编程模块 concurrent.futures 的使用

doc

0x0 concurrent.futures 模块

concurrent.futures 模块是python3.2 之后加入标准库的,它为异步执行任务提供了抽象接口,通过 ThreadPoolExecutor 和 ProcessPoolExecutor 分别提供基于线程和进程的异步执行,接口由 Executor 抽象类定义。

  1. Executor 抽象类
1
class concurrent.futures.Executor:

定义了以下方法:

  • submit(fn, *args, **kwargs) : 提交一个函数到 executor 中执行

  • map(func, *iterables, timeout=None, chunksize=1) :提交一个函数和一组输入,映射为多个任务worker到executor中执行, chuncksize 表示将输入分成数量为 chunksize 的分组,输入到一个任务,只对 ProcessPoolExecutor 有效;返回值是每个任务执行 func 的返回值列表

  • shutdown(wait=True) : 关闭executor,wait=True 表示等待所有任务完成再关闭

  1. TheadpoolExecutor 线程池
1
class concurrent.futures.ThreadPoolExecutor(max_workers=None, thread_name_prefix='')
  • max_workers: 指定池中最大的线程数,默认为cpu核心数*5
  • thread_name_prefix:线程名字前缀,方便调试
  1. ProcessPoolExecutor 进程池
1
class concurrent.futures.ProcessPoolExecutor(max_workers=None)
  • max_workers: 指定池中最大的进程程数,默认为cpu核心数
  1. Future 对象
    executor.submit 返回到是 future 对象,返回代表executor已经登记了这个异步任务,future对象包装了func,提供控制异步任务的接口

    class concurrent.futures.Future

    cancel(): 取消任务,返回值True表示成功取消

    cancelled():是否已经取消

    running():是否正在运行

    done(): 是否完成

    result(timeout=None): 等待异步任务的返回值, 如果取消了抛 CancelledError 异常

    exception(timeout=None): 如果发生了异常,取出异常

    add_done_callback(fn): 添加回调函数,异步任务完成则回调,回调会在添加回调的线程执行,如果抛出的异常是 Exception的子类,会被忽略

    以下几个用于单元测试
    set_running_or_notify_cancel()
    set_result(result)
    set_exception(exception)

  2. 模块方法,用于等待 future 结果

  • concurrent.futures.wait(fs, timeout=None, return_when=ALL_COMPLETED)
    与 asyncio 的 api ayncio.wait 是一样的功能;
    返回完成的和为完成的两组 Futures 结果, 用 future.result() 获取结果
    它会等待 futures 执行的结果,默认 return_when=ALL_COMPLETE 会等到所有futures都完成才返回, FIRST_COMPLETED 表示有一个完成就返回,FIRST_EXCEPTION表示有一个产生异常就返回

  • concurrent.futures.as_completed(fs, timeout=None)
    返回的是一个生成器对象,先完成的future的结果先返回

0x1 使用 ThreadPoolExecutor 进行编程

  1. 使用 with 语句创建一个 executor
    with concurrent.futures.ThreadPoolExecutor(max_workers=2) as executor

  2. 使用 executor.submit 提交任务
    对返回的多个 future 需要使用模块函数 concurrent.futures.as_completed 或 wait 进行处理;
    as_completed 处理的 futures 先完成先返回结果
    NOTE: wait 返回到是两个值, 分别是完成的 future 列表和pending的future列表

  3. 或使用 executor.map 创建任务多个任务
    map 直接返回结果列表,所有任务都完成,才返回

  4. 等待结果

1
2
3
4
5
6
7
8
9
10
11
12
13
14
15
16
17
18
19
20
21
22
23
24
25
26
27
28
29
30
31
32
33
34
35
36
37
38
39
import time
import random
URLS = ['http://www.foxnews.com/',
'http://www.cnn.com/',
'http://europe.wsj.com/',
'http://www.bbc.co.uk/',
'http://some-made-up-domain.com/']

def load_url(url, timeout=None):
print("load url ", url, threading.current_thread().getName())
time.sleep(random.random())
return "page for " + url

def submit_example():
# We can use a with statement to ensure threads are cleaned up promptly
with concurrent.futures.ThreadPoolExecutor(max_workers=2) as executor:

# Start the load operations and mark each future with its URL
future_to_url = {executor.submit(load_url, url, 60): url for url in URLS}
time.sleep(10)
# 等待执行完成, 先完成先返回
for future in concurrent.futures.as_completed(future_to_url):
url = future_to_url[future]
try:
data = future.result()
except Exception as exc:
print('%r generated an exception: %s' % (url, exc))
else:
print('%r page is %d bytes' % (url, len(data)))

def map_example():
with concurrent.futures.ThreadPoolExecutor(max_workers=2) as executor:
# 开始执行,全部执行完成才返回,按顺序返回
results = executor.map(load_url, URLS, chunksize=2) # chunksize is ignored by ThreadPoolExecutor.
print("result: ", list(results))

if __name__ == '__main__':
submit_example()
map_example()

0x2 使用 ProcessPoolExecutor 进行编程

api 与 ThreadPoolExecutor 是相同的, 上面例子直接替换 ThreadPoolExecutor 为 ProcessPoolExecutor 就变成了进程池。

0x3 multiprocessing.pool 模块

python 另一个模块 multiprocessing 也提供了进程池和线程池,分别是:
multiprocessing.Pool 进程池
multiprocessing.pool.ThreadPool 线程池

用法类似 executor 的 map 方法

1
2
p = Pool(5)   # 线程版 p = ThreadPool(5)
results = p.map(func, [1, 2, 3])

用法跟 executor 很接近, 但是 python 文档里一直没有关于 ThreadPool 的部分,所以 ThreadPool 是一个未完成的和充分测试的模块,谨慎使用。

例子源码: https://github.com/chenjiancan/asyncio_exam/combo

python异步io

Posted on 2018-08-13 | In python , 并发

0x0 关联概念

  1. 异步vs同步 阻塞vs非阻塞 的概念
  • 同步和异步:描述的是通信的双方约定的返回结果的方式。

    • 同步: 请求方发出请求后,等待直到对方有结果,把结果取回来
    • 异步:请求方发出请求后,对方有结果了,对方把结果送过来

      比如我们需要在 7 点钟出门,同步的方式就是一直看时间,看到7点,知道时间到了;异步的方式是调个7点的闹钟,闹钟一响,知道时间到了。

  • 阻塞和非阻塞:描述的是程序调用(耗时的动作,如IO)发生后的调用方的状态

    • 阻塞: 调用后,调用方的线程就停下来,知道调用完成返回才继续执行
    • 非阻塞: 调用后,直接返回,调用方继续执行

      比如: 我们需要7点出门,查看时间是否到了7点,阻塞的方式,就是一直看着时钟,等到7点; 非阻塞的方式可以是,瞄一下时钟,如果没到7点,打一盘游戏,再瞄一下,没到继续玩,反复直到时间到了。

  • 我觉得要讨论一个过程是同步/异步,一个调用时阻塞/非阻塞,必须针对具体的对象来说。

我们应用可以用异步的方式封装 select、poll 这种同步结构,因为针对的对象不同,就称为不同的方式。 asyncio 成为异步io,但是底层可能用到是 select 实现的。

  1. 协程是什么 和线程、进程有什么区别
  • 进程是操作系统任务的单位: 每个进程有独立的内存空间,互不干扰,创建进程需要创建或者拷贝进程空间,占用很多资源,进程切换需要内核切换上下文
  • 线程是同一个进程内,共享进程空间的任务单位,线程每个线程有独立的控制块,是虚拟出来的并发执行的任务,但是共享内存,线程切换需要内核切换上下文
  • 协程是用户态实现的,协程切换任务由应用层面实现,开销很小。同个调度器下的协程应该是在同一个线程内
  1. gevent 是什么
    http://sdiehl.github.io/gevent-tutorial/
    https://segmentfault.com/a/1190000006945621

gevent 是一个 python 库,用于 “异步化” python 阻塞代码,可以实现用单线程并发执行多任务。
比如正常 socket 库是同步的,我们正常写的 socket.connect/read/write 都是阻塞,要并发,通常使用多线程,而gevent通过monkey patch的
方式,直接修改了socket标准库的运行时代码,使得代码运行起来是非阻塞的。

  1. gunicorn
    http://docs.gunicorn.org/en/stable/design.html

  2. Twisted

  3. asyncio 是什么
    python3.5+ 的标准库,用于编写异步应用 (Note)
    http://asyncio.readthedocs.io/en/latest/getting_started.html

异步IO是计算机操作系统对输入输出的一种处理方式:发起IO请求的线程不等IO操作完成,就继续执行随后的代码,IO结果用其他方式通知发起IO请求的程序。与异步IO相对的是更为常见的“同步(阻塞)IO”:发起IO请求的线程不从正在调用的IO操作函数返回(即被阻塞),直至IO操作完成。
– Wikipedia

0x1 Asyncio 编程

协程是基于生成器 yield 的特性实现的,不是 python3.5 之后才有的,但是 python3.5之后,带来了 async, await 关键字等更加自然的支持,我们可以比较容易的理解和使用协程,所以这里我都是以 python3.5+ 的特性学习。

但是协程不是生成器,协程和生成器混淆就很头大了。

tornado 的特点就是基于异步io,后面的版本也迁移到 asyncio 上。
https://github.com/tornadoweb/tornado/blob/master/docs/releases/v5.0.0.rst

  1. async, await 关键字
  • async def: 用于定义协程(coroutine function),与 @asyncio.coroutine 一样

    async def get_web_page(url):
        return page
    
    iscoroutinefunction(get_web_page)
    
  • await: 与 yield from 作用一样,等待一个协程返回

  1. coroutine vs future vs task
    A task is a subclass of Future.
    A task is a future that is wrapping a coroutine in particular.
    Task 是Futhure 的一个特例,它包装的是一个 coroutine,有一些负责处理 coroutine 的方法
    http://lucumr.pocoo.org/2016/10/30/i-dont-understand-asyncio/
    future 是一个最终会返回结果的对象, 太难解释了,还是等我真正理解了在说吧 😝

  2. eventloop
    是一个集中调度Task的处理器,

下面是一个简单的event loop 调度协程的例子

1
2
3
4
5
6
7
8
9
10
11
12
13
14
15
import asyncio

async def compute(x, y):
print("Compute %s + %s ..." % (x, y))
await asyncio.sleep(1.0) # e)
return x + y

async def print_sum(x, y):
result = await compute(x, y) #d)
print("%s + %s = %s" % (x, y, result))

loop = asyncio.get_event_loop() # a)
task = loop.creat_task(print_sum(1, 2)) # b)
loop.run_until_complete(task) # c)
loop.close()

a) b) c) 使用 event loop 创建了一个 task,并且运行 task
d) task运行中, 执行 print_sum 遇到 await compute(x, y),需要等待协程 compute 执行,转而执行 compute
e) compute 协程运行遇到 await asyncio.sleep(1.0),转而执行协程 sleep,sleep协程中创建了新的future用来定时,并且等待future完成,而future里肯定封装了 event loop 的调度魔法,使得 task 暂停了,并且跑去执行用于定时的 task
z) 定时完成之后,event loop 重新执行 task,又恢复到了 compute 协程,继续运行,compute 返回,协程结束,又回到 print_sumx协程, print_sum 也返回协程结束,task 也结束

协程调度图示

  1. 常用 api
    rtfm: https://docs.python.org/3.6/library/asyncio-eventloop.html
    base_event.py 查看源码实现
    理解协程工作原理,一定要时刻记得协程是在一个线程上运行的,这样就会更容易理清关系。
  • task.add_done_callback:给任务添加一个callback,callback 方法的签名是当个参数,参数是 future,任务完成后,通过 call_soon 调度

    1
    2
    3
    4
    5
    6
    7
    8
    9
    10
    11
    12
    13
    14
    15
    16
    17
    18
    19
    20
    async def cor():
    print("cor start")
    await asyncio.sleep(1)

    print("cor wake")
    return True

    def callback(future):
    print("result:", future.result()) # result: True
    print("stoping loop")
    loop.stop()

    if __name__ == '__main__':
    loop = asyncio.get_event_loop()
    task = loop.create_task(cor())
    task.add_done_callback(callback)

    loop.run_forever()
    print("leave forever")
    loop.close()
  • task.cancel:取消一个任务,会向任务对应的协程抛出一个 asyncio.CancelledError 异常,如果协程没有捕获,task就会结束;如果协程内拦截了该异常,则task不会被取消

    1
    2
    3
    4
    5
    6
    7
    8
    9
    10
    11
    12
    13
    14
    15
    16
    17
    18
    19
    20
    21
    22
    23
    async def my_coroutine():
    try:
    print("mytask start")
    await asyncio.sleep(2)
    except asyncio.CancelledError as e:
    print("exception: asyncio.CancelledError, "
    "task.cancel() 会向被协程抛 CancelledError "
    "如果捕获不想上抛,则阻止了本次cancel")
    raise # 取消
    print("mytask end")
    return True

    async def stop_coroutine(task):
    await asyncio.sleep(1)
    task.cancel() # 取消任务

    if __name__ == '__main__':
    with closing(asyncio.get_event_loop()) as loop:
    task = loop.create_task(my_coroutine())
    loop.run_until_complete(stop_coroutine(task))
    print('canceled: ', task.cancelled())
    loop.run_forever()
    loop.close()
  • ayncio.gather(futures): 创建一个 future (outer),把 一组futures作为它是子任务,等待所有子任务都完成了,返回子任务的 result 列表,result顺序和 futures 顺序一一对应。创建的future,别忘了丢到event loop 里

    1
    2
    3
    4
    5
    6
    7
    8
    9
    10
    11
    12
    13
    async def cor1():
    print("cor1")
    return "cor1 result"

    async def cor2():
    print("cor2")
    return "cor2 result"

    if __name__ == '__main__':
    with closing(asyncio.get_event_loop()) as loop:
    outer_future = asyncio.gather(cor1(), cor2()) # 汇集成一个future
    result = loop.run_until_complete(outer_future) # 返回两个协程的结果列表
    print("result: ", result)
  • ayncio.wait_for:

  • ayncio.wait: 是一个生成器方法, wait() 是一个协程
    coroutine asyncio.wait(futures, *, loop=None, timeout=None, return_when=ALL_COMPLETED)
    done, pending = await asyncio.wait(fs)
    返回完成的和为完成的两组 Futures 结果, 用 future.result() 获取结果
    它会等待 futures 执行的结果,默认 return_when=ALL_COMPLETE 会等到所有futures都完成才返回, FIRST_COMPLETED 表示有一个完成就返回,FIRST_EXCEPTION表示有一个产生异常就返回

    1
    2
    3
    4
    5
    6
    7
    8
    9
    10
    11
    12
    13
    14
    15
    16
    17
    18
    19
    20
    21
    22
    23
    24
    25
    26
    27
    async def cor1():
    print("cor1")
    await asyncio.sleep(1)
    return "cor1 result"

    async def cor2():
    print("cor2")
    return "cor2 result"


    with closing(asyncio.get_event_loop()) as loop:
    outer_future = asyncio.wait(
    (cor1(), cor2()),
    return_when=asyncio.FIRST_COMPLETED # 有一个完成就返回
    )
    # 返回两组task, 完成的与未完成的
    completed, pending = loop.run_until_complete(outer_future)
    print("compled: ", completed)
    for c in completed:
    print("完成的result:", c.result())

    print("pending: ", pending) # 有一个任务没有完成,pending了

    outer_future2 = asyncio.wait_for(list(pending)[0], timeout=1) # 继续等待未完成的
    result2 = loop.run_until_complete(outer_future2)
    print("pending 的task 继续完成的result:", result2)
    print("the end ")
  • ensure_future:传入协程或者 future,如果是协程,则调用 creat_task 创建task,并返回;如果传入的是future,且已经是属于一个event loop的,则直接返回。作用是确保参数 coro_or_future 加入在event loop中调度

    NOTE: Task 是 Future 的子类

  • asyncio.shield: 使协程或future不可取消,它拦截掉
    下面代码和签名cancel例子唯一的不同就是

1
2
# task = loop.create_task(my_coroutine())  # 协程可被取消
task = loop.create_task(asyncio.shield(my_coroutine())) # 保护协程不被取消
1
2
3
4
5
6
7
8
9
10
11
12
13
14
15
16
17
18
19
20
21
22
23
24
25
26
27
28
29
30
31
32
33
34
async def another_coroutine():
print("hello")
return "hi"

async def my_coroutine():
try:
print("mytask start")
await asyncio.sleep(2)

except asyncio.CancelledError as e:
print("exception: asyncio.CancelledError, "
"task.cancel() 会向被协程抛 CancelledError "
"如果捕获不想上抛,则阻止了本次cancel")
raise

await asyncio.sleep(3)
print("mytask end")
return True

async def stop_coroutine(task):
await asyncio.sleep(1)
task.cancel() # 取消其他任务
result = await another_coroutine()
print(result)

if __name__ == '__main__':
with closing(asyncio.get_event_loop()) as loop:

# task = loop.create_task(my_coroutine()) # 协程可被取消
task = loop.create_task(asyncio.shield(my_coroutine())) # 保护协程不被取消

loop.run_until_complete(stop_coroutine(task))
print('canceled: ', task.cancelled())
loop.run_forever()
  • loop.create_task: 创建 Task 到 event loop 调度器中,run_forevent 才开始调度

    1
    2
    3
    4
    5
    6
    7
    8
    9
    10
    11
    12
    13
    14
    async def say(what, when):
    await asyncio.sleep(when)
    print("say {0} on {1}".format(what, when))

    if __name__ == '__main__':
    loop = asyncio.get_event_loop()
    # create tasks
    task1 = loop.create_task(say("hello", 2))
    task2 = loop.create_task(say("hi", 3))
    task3 = loop.create_task(say("hey", 1))
    # run task created in even loop
    loop.run_until_complete(asyncio.wait((task1, task2, task3)))
    print("all task done") # would not happen here
    loop.close()
  • loop.create_task vs asyncio.ensure_future
    参考: https://stackoverflow.com/questions/36342899/asyncio-ensure-future-vs-baseeventloop-create-task-vs-simple-coroutine
    create_task 把一个协程包装成task进行调度; ensure_future 如果传入的是一个协程,则调用 create_task 转换成task进行调度,如果是future,则什么都不做,语义是确保传入的对象能被调度。
    前者精确的调度协程,后者是协程或future, 如果明确的知道传入对象的类型是协程,那就用 create_task, 如果不确定,那就用 ensure_future —— 通常在编写内部api时会需要,参考asyncio.gather 源码。

当我们使用 create_task 意味着我们需要后台运行指定任务,被创建的任务和当前所在任务是并发运行的,如果不需要后台运行,则使用 await 串行运行

  • loop.run_until_complete: 传入 coro_or_future,作用是等待一个 future 完成,并返回result,如果传入的是 cor,会用 ensure_future 包装为任务(多次调用同一个cor会产生不同的任务,如果希望只有一个,可用 ensure_future 先创建future)。内部实现是利用add_done_callback设置回调,然后run_forever 知道完成或异常

  • loop.run_forever:持续运行事件循环,子任务只能通过 Future.add_done_callback() 来得到结果,或者调用 loop.stop() 停止run_forever

  • loop.call_later/call_soon/call_at: 再 loop 中(延迟)执行传入的函数,这里的函数不是协程,是普通函数, 返回handler, handler.cancel 可以取消
    callback 用于执行简单的任务,注意他是不同函数,不是协程,所以不能使用 await 来和协程协作,执行要么成功返回要么异常

  • 什么时候发生调度
    并不是 await 导致event loop 任务调度,而是 await 执行的协程内部调用 asyncio 的相关api导致的,直接在 await 所执行的协程内部用 time.sleep(10) 暴力阻塞,就会发现,其他协程都没运行机会

例子代码源码: https://github.com/chenjiancan/asyncio_exam

0x2 Transports and protocols

https://docs.python.org/3.6/library/asyncio-protocol.html

Transports are classes provided by asyncio in order to abstract various kinds of communication channels. You generally won’t instantiate a transport yourself; instead, you will call an AbstractEventLoop method which will create the transport and try to initiate the underlying communication channel, calling you back when it succeeds.

Once the communication channel is established, a transport is always paired with a protocol instance. The protocol can then call the transport’s methods for various purposes.

When subclassing a protocol class, it is recommended you override certain methods. Those methods are callbacks: they will be called by the transport on certain events (for example when some data is received); you shouldn’t call them yourself, unless you are implementing a transport.

Transport 定义了数据传输通道,比如 BaseTransport,TCP, UDP, SSL,subprocess pipe 是 asyncio 已经实现的 transport,我们可以继承他们来试下自己的传输层
protocol 定义了数据传输的协议,asyncio.Protocol 定义了基本接口,通过继承它可以实现自己的协议,asyncio 实现了 Protocol(for tcp or ssl), BufferedProtocol,DatagramProtocol, SubprocessProtocol 等。

protocol 是和 transpport 配对使用的。

使用步骤是通过继承的方式,实现一个 Protocol 类作为 protocol factory,然后使用 asyncio 的API, eg: create_connection 创建对应的 协程或task

  1. tcp
    AbstractEventLoop.create_server: 创建 tcp server端
    AbstractEventLoop.create_connection: 创建tcp连接到 server
    代码: https://github.com/chenjiancan/asyncio_exam/transport_protocol/tcp

  2. udp

    1
    2
    3
    4
    5
    6
    7
    8
    9
    10
    11
    12
    13
    14
    15
    loop.create_datagram_endpoint(self, protocol_factory,
    local_addr=None, remote_addr=None, *,
    family=0, proto=0, flags=0,
    reuse_address=None, reuse_port=None,
    allow_broadcast=None, sock=None)
    ```
    服务端绑定端口使用 local_addr
    客户端使用 remote_addr 指定服务端地址
    代码: https://github.com/chenjiancan/asyncio_exam/transport_protocol/udp


    ## 0x3 Streams
    1. stream tcp
    ```python
    coroutine asyncio.start_server(client_connected_cb, host=None, port=None, *, loop=None, limit=None, family=socket.AF_UNSPEC, flags=socket.AI_PASSIVE, sock=None, backlog=100, ssl=None, reuse_address=None, reuse_port=None, ssl_handshake_timeout=None, start_serving=True)
  • start_server: 启动tcp或unix server,并再 event loop 监听连接,参数
  • open_connection: 客户端发起连接

一个简单的tcp server & client 模型: https://github.com/chenjiancan/asyncio_exam/echo_tcp

1
2
3
4
5
6
7
8
9
10
11
12
13
14
15
16
17
18
19
20
21
22
23
24
25
26
27
28
29
30
# 客户端连接进来的回调
async def on_client_connected(reader, writer):
print("connected")
loop = asyncio.get_event_loop()
data = await reader.read(100)
message = data.decode()
addr = writer.get_extra_info('peername')
print("Received %r from %r" % (message, addr))

print("Send: %r" % message)
writer.write(data)

await writer.drain() # flush
print("Close the client socket")
writer.close()

async def main():
# create tcp server
print("start server!")
# start_server is a coroutine, await it
server = await asyncio.start_server(client_connected_cb=on_client_connected, host="127.0.0.1", port=8090,
loop=asyncio.get_event_loop())
print('Serving on {}'.format(server.sockets[0].getsockname()))

if __name__ == '__main__':
loop = asyncio.get_event_loop()
loop.create_task(main())
loop.run_forever()

loop.close()

1
2
3
4
5
6
7
8
9
10
11
12
13
14
15
async def main():
reader, writer = await asyncio.open_connection('127.0.0.1', 8090, loop=asyncio.get_event_loop())
message = "hi"
print('Send: %r' % message)
writer.write(message.encode())

data = await reader.read(100)
print('Received: %r' % data.decode())

print('Close the socket')
writer.close()
if __name__ == '__main__':
loop = asyncio.get_event_loop()
loop.run_until_complete(main())
loop.close()

使用gitment评论系统

Posted on 2018-08-12 | In blog

本篇日志记录如何使用 gitment 为博客提供评论系统

0x0 Gitment

Gitment

是一个基于 github issue 系统作为评论数据的评论系统,hexo next 主题支持 Gitment

它的特点是不需要部署服务端,使用 github repo 的issue作为数据空间,这一点跟 hexo 使用 github pages 的调调很搭。

0x1 准备

  1. 首先,我们得创建一个 github repo
    直接使用博客的 repo 就可以了

  2. 其次, 需要创建 github auth 应用

进入 https://github.com/settings/developers 创建 OAuth Apps;
填写相关信息
应用名如: Gitment
homepage url: https://chenjiancan.github.io
https://chenjiancan.github.io

创建完成得到了 Client ID & Client Secret,用于配置 gitment 应用

  1. 配置next主题
    编辑 next/_config.yaml, 找到 gitment 部分
    1
    2
    3
    4
    5
    6
    7
    8
    9
    10
    11
    12
    13
    gitment:
    enable: true
    mint: true # RECOMMEND, A mint on Gitment, to support count, language and proxy_gateway
    count: true # Show comments count in post meta area
    lazy: false # Comments lazy loading with a button
    cleanly: false # Hide 'Powered by ...' on footer, and more
    language: # Force language, or auto switch by theme
    github_user: chenjiancan # 必须填写github id
    github_repo: gitment-comments # 必须填写要存放评论的 repo 名字
    client_id: <Client ID 的值> # 必须填写github auth app 的 Client ID
    client_secret: <Client Secret 的值> # 必须填写github auth app 的 Client Secret
    proxy_gateway: # Address of api proxy, See: https://github.com/aimingoo/intersect
    redirect_protocol: # Protocol of redirect_uri with force_redirect_protocol when mint enabled

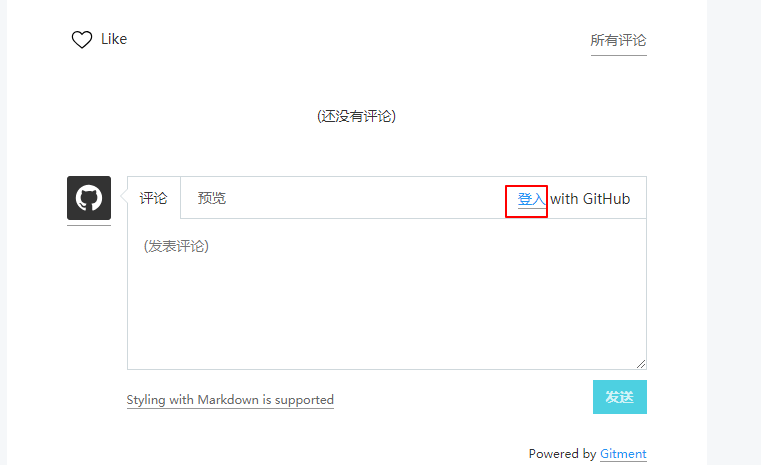
重新生成站点,部署,查看帖子底部,就会出现评论区

评论区截图
点击登录,授权 github 账号权限给 Gitment 应用,就具有评论权限了。

  1. 初始化评论
    Gitment 默认每篇日志的评论都需要先点击初始化本页评论按键,进行初始化后,才能正常评论,其实它是向issue创建一个label (默认以日志的标题作为值),然而,如果是中文标题的就会初始化失败,原因是 标题太长,超出github的限制, 参考 https://github.com/imsun/gitment/issues/66 ,解决方法是改变 Gitment 代码,让它使用短一点点字段,比如用日期,这里使用的方式是 id: decodeURI(window.location.pathname),具体是修改 /themes/next/layout/_third-party/comments/gitment.swig 里的

博客标签和分类

Posted on 2018-08-12 | In blog

本篇日志记录为 hexo 博客添加标签 tags 和分类功能 categories.
tags: 每篇日志可以有多个标签,就是关键词的意思,方便索引
categories:每篇日志可以按内容,属性去分类,书的目录一样,树形归类
archives:归档,按日期归档

0x0 hexo front-matter

说明文档

hexo 每篇Markdown文档头部使用 front-matter 块来描述文章的标题,发布日期,标签,分类等元信息,支持 yaml 格式:如本文的

---
title: 博客标签和分类
date: 2018-08-12 11:45:24
tags: [hexo, blog]
categories: [blog]
---

其中 tags 和 categories 字段就是描述标签和分类的,两个字段的值用数组的形式表达。

0x1 hexo page

我们使用 hexo new “title” 创建新日志,默认是创建在 sourece/_post 下,是普通日志
为了显示标签列表页和分类列表页,得创建单独的页面, 在 hexo 里,使用

hexo new page "page_name" 

来创建,创建 sourece/page_name 目录

  1. 创建 tags 页面

    hexo new page "tags" 
    

    并编辑 sourece/tags/index.html 的 front-matter,指定 type,其中 comments: false 表示此页不显示评论区

    ---
    title: All tags
    date: 2018-08-12 11:30:36
    type: "tags"
    comments: false
    ---
    
  2. 创建 categories 页面

    hexo new page "categories" 
    

    并编辑 sourece/categories/index.html 的 front-matter

    ---
    title: categories
    date: 2018-08-12 11:37:55
    type: "categories"
    comments: false
    ---
    

    现在我们重新生成站点,部署后,我们可以在 https://chenjiancan.github.io/tags/ 页面下看到标签, https://chenjiancan.github.io/categories 下看到分类列表。
    但是我们的首页还没有入口可以进入。

0x2 配置主题菜单

我们的页面样式是依赖主题的,比如我是用 next 主题,就需要在 nex 主题的 _config.yaml 配置页面菜单页菜单项对应的 url

  1. _config.yaml

    menu:
        home: / || home
        about: /about/ || user
        tags: /tags/ || tags
        categories: /categories/ || th
        archives: /archives/ || archive
        # #schedule: /schedule/ || calendar
        # #sitemap: /sitemap.xml || sitemap
        # #commonweal: /404/ || heartbeat
    

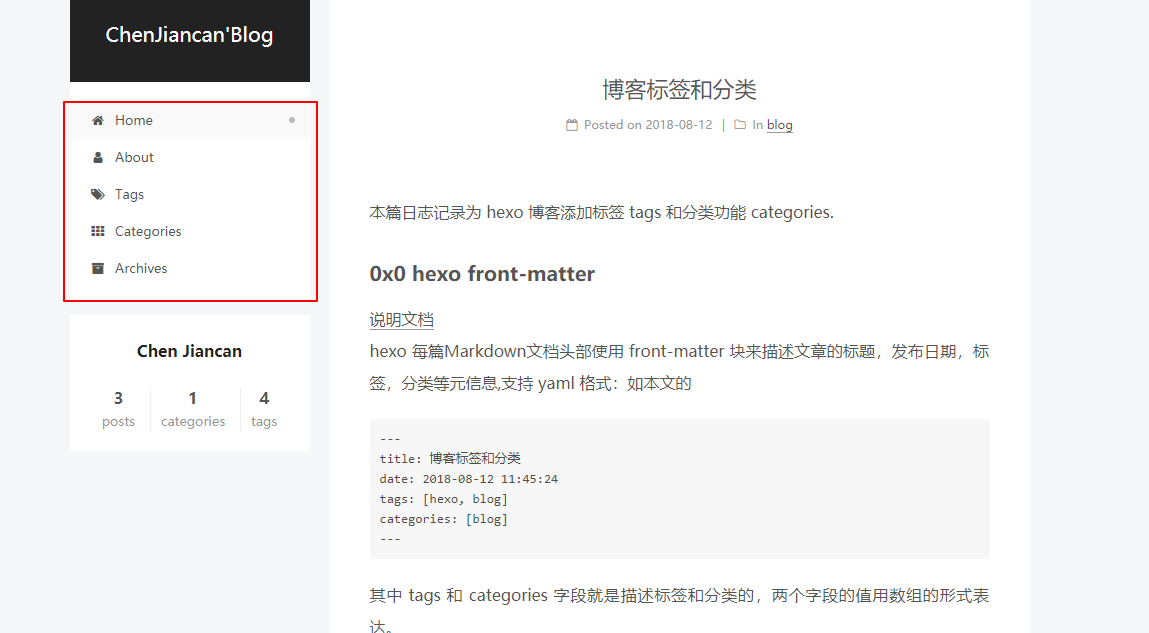
    看看效果,菜单的效果,可以看出, menu 下每个字段对应菜单的一个入口,值便是入口地址的相对 url。

    Note: || 后面的字符串表示的是 icon 的名字

  2. tags page 效果

是标签云的样子

  1. categories page 效果
    是目录的样子

0x3 增加 about 页面

同样的方式,about 是一个页面

hexo new page "about" 

这么简单就创建了 about 页面了,前面我已经在主题的 _config.yaml 里配置 about 了

搭建个人博客

Posted on 2018-08-11 | In blog

本篇日志记录如何使用 hexo 来部署个人博客到 github pages, 并构建编辑器的过程。

0x0 原理

  1. github pages
    github pages 官网介绍

    • github pages 是github为github用户提供的免费的静态页面空间,它与github repo是挂钩的。
    • github pages 有两种, a) 给用户用的, 比如我的github用户名是 chenjiancan,github 主页是 https://www.github.com/chenjiancan/, 那么,创建一个repo名称为 chenjiancan.github.io, 它便可以和 https://chenjiancan.github.io 站点挂钩; b) 是给项目用的,比如我有一个repo名字是 myrepo, 那么,为 myrepo 创建一个名字为 gh-pages 分支,它就与 https://chenjiancan.github.io/myrepo 站点挂钩。

    • 上面说的挂钩,就是github page的魔法了,当你做好设置后,访问 https://chenjiancan.github.io,github 就会帮你解析到对应 repo,并从改repo拉去静态页面; 比如我在 https://www.github.com/chenjiancan/chenjiancan.github.io 下放置一个 index.html 文件,内容为:

      1
      Hello World!

      当我访问 https://chenjiancan.github.io/index.html 时浏览器就会显示 Hello World!

      这样,我们可以用 github pages 这个功能来写文章,每片文章就是一个 html 文档,不过,如果这样子效率一定很低,而且你肯定希望你的博客有统一且漂亮的样式 ——— 这就是 hexo 的作用了。

  2. hexo
    (hexo 官网介绍)[https://hexo.io/]
    hexo 是一个基于 nodejs 的开源项目,用于生成静态网页,同时驱动了一个基于hexo的博客主题、插件的社区。

    Markdown 格式受很多博客作者青睐,很多开源项目的人 README 就是 Markdown 格式。hexo 支持我们使用 Markdown 写作,帮我们把 Markdown 文本生成 html 文档和静态资源(图片等),并组织成一整个站点,结合hexo主题,就可以把日志包装成一个漂亮的博客站点。

    我们的仓库是 host 在 github 的, hexo 支持 git 方式进行部署。

0x1 准备工作

将会用到 git、nodejs、npm、hexo、ssh 等工具。以下以在 ubuntu 环境下的操作介绍,由于 这些工具都有跨平台实现,基本都是一样的。

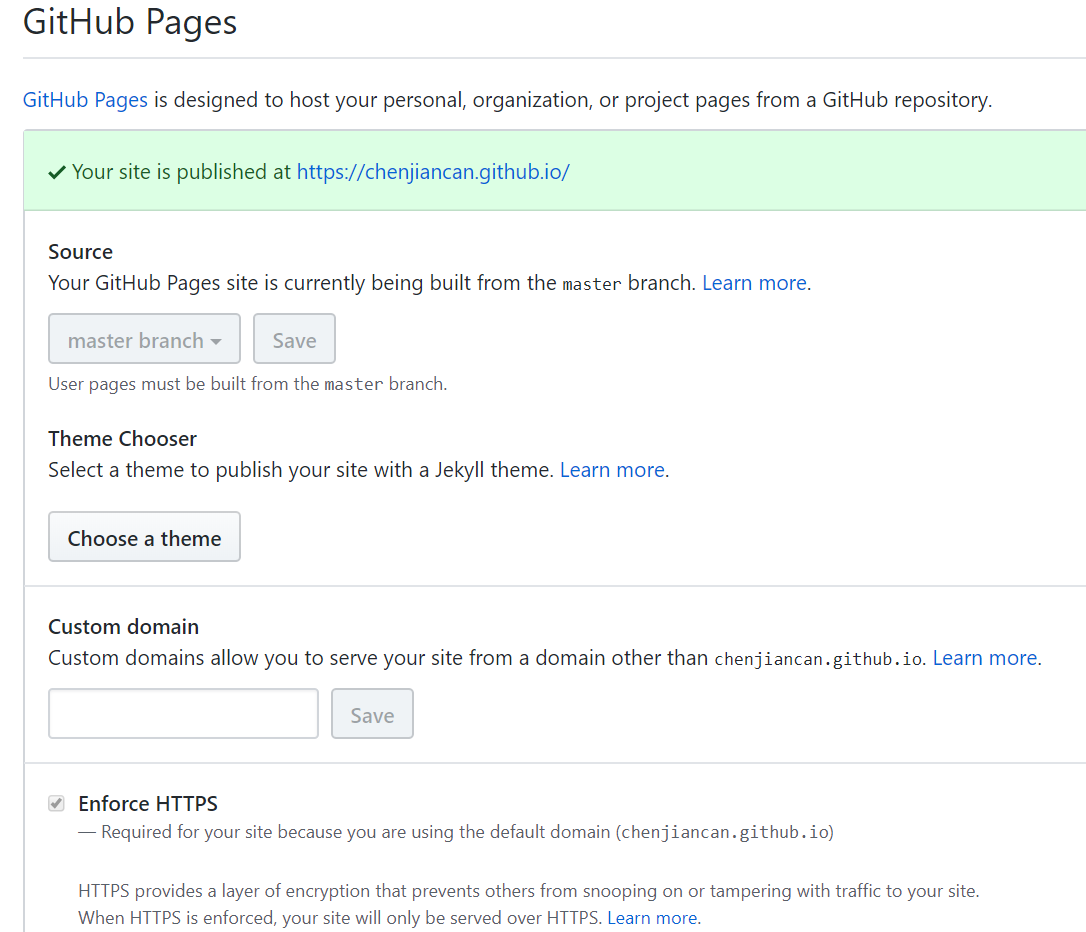
  1. 创建github repo,并设置启用 github pages
    以用户 page 为例
    用户名是 jack, 则创建名为 jack.github.io 的仓库

    进入设置页
    setting

  2. 安装 nodejs
    在本地pc安装nodejs
    安装指定版本的 nodejs, setup_ 后面跟版本号, 直接打开签名的链接去看说明
    curl -sL https://deb.nodesource.com/setup_10.x | sudo -E bash -
    sudo apt-get install nodejs

  3. 安装hexo
    sudo npm install -g hexo-cli

0x2 创建本地博客

hexo 使用文档

  1. 初始化
    hexo init blog
    创建一个hexo工程,blog 是创建的文件夹的名字,随意
    目录结构:

    其中,_config.yaml 是配置文件,大部分设置都会在这个文件里编辑;
    source/ 目录将是我们文章的源文本和静态资源所在的地方
    .deploy_git/ 是生成静态站点源码的地方,它是一个 git repo,最终就是将他同步到 github repo的

  1. 新建日志
    hexo new mypost
    创建了一个名为 mypost 的日志,位于 /source/_post/ 下,以日期作为归档

    我们编辑 mypost.md, 输入

    ## Hello World
    
  2. 生成站点
    hexo g

  3. 本地部署
    hexo s
    默认将在 http://localhost:4000/ 启动web服务,可以打开看看,不出一个外,你会看到我们创建的文章列表

  4. 部署到 github pages
    接下来就需要配置关联 github repo了
    编辑 _config.yml,找到 deploy 部分,编辑为对应的github repo,如:

    deploy:
        type: git
        repo: git@github.com:chenjiancan/chenjiancan.github.io.git
        branch: master
    

    别忘了配置你的 git ssh 公钥到 github!

    以下命令自动部署站点到 github pages
    hexo d

  5. 开始体验
    打开 https://chenjiancan.github.io 进行浏览

0x3 然后呢

现在我们有一个博客了,本地写写 markdown 日志,就能推送到github pages。
虽然这个系统已经可以用来了,但是只在机械的用命令行创建日志,编辑markdown,生成站点,部署站点未免太枯燥,博客主题可能不合胃口,文章也要版本管理吧。
没错,我们还要继续折腾。

0x4 博客主题

hexo 工程目录下 theme/ 目录用来存放安装的主题,可以从 https://hexo.io/themes/ 找到喜欢的主题对应的 github repo, 直接clone 到 theme下面,就可以使用该主题,eg:
git clone https://github.com/klugjo/hexo-theme-clean-blog.git themes/clean-blog
配置 _config.yml, 找到 theme, 配置为
theme: clean-blog
重新生成,done!

Note: 具体主题的配置请浏览对应的github 仓库说明。

0x5 使用 VSCode 编辑,发布日志

很多编辑器支持 Markdown 格式的编辑,预览,我也尝试了很多,现在我推荐 VSCode,你可以使用任何你喜欢的。

  1. 安装 Visual Studio Code (VSCode)
    https://code.visualstudio.com/
    VSCode 默认已经支持 Markdown 语法和预览
    快捷键: ctrl+k, v

  2. 安装 Paste Image 拓展
    Paste Image
    使用 Markdown 的朋友都知道插入图片可以变成一个麻烦的事,我们使用过富文本编辑器都习惯复制粘贴来插入图片, Paste Image 这个插件就满足我们这个需求。
    我们需要配置拓展,指定图片要保存的目录以及url相对地址等属性

VSCode 的配置有三个层面:
1) 全局用户配置,影响用户的所有工程
2) 工程配置,针对具体工程有效,会覆盖重叠的全局配置,保存在工程配置文件 .code-workspcce 文件的 settings 中

3)目录配置,只在从特定目录打开有效,保存在目录下的 .vscode/settings.json 中

因为博客的设置是相对特殊的,所以最好为 source 目录创建一个 VSCode 工程,并在工程配置里配置, File -> Preference -> Settings 就会打开三个配置的编辑界面。

{
    "folders": [
        {
            "path": "."
        }
    ],
    "settings": {
        "pasteImage.path": "${projectRoot}/img/${currentFileNameWithoutExt}",   # 配置图片保存在 source/img/文字名字/ 路径下
        "pasteImage.basePath": "${projectRoot}",  # 配置()内 url 的相对路径的基准路径
        "pasteImage.forceUnixStyleSeparator": true,
        "pasteImage.prefix": "/"   
    }
}

现在,我们就可以测试从浏览器 copy image,在编辑器里使用快捷键 ctrl+alt+v 进行粘贴的。
正常情况下,你将会看到
"![](/img/搭建个人博客/2018-08-11-23-34-00.png)" 这样的格式链接变粘贴

现在我们就可以愉快的写文章了!

#0x6 变得更懒
你没有猜错,VSCode 还有 hexo 插件,安装 vscode-hexo ,就能在 VSCode 内部进行 hexo 的命令操作。
Ctrl-Shift-P 唤起命令输入入口, 以下命令可以使用

  • hexo init # Initializes a website
  • hexo new # Creates a new article
  • hexo generate # Generates static files
  • hexo publish # Publishes a draft
  • hexo server # Starts a local server
  • hexo stop # stop a local server(Ctrl-C)
  • hexo deploy # Deploys your website
  • hexo clean # Cleans the cache file (db.json) and generated files

#0x7 总结
终于,我们折腾出了一个集成博客编辑器,它有如下特点:

  • 以 VSCode 作为交互界面
  • 以 Markdown 作为文章格式
  • 依托于 hexo 进行静态站点生成和部署
  • 托管在 github pages 和 github 上

更多打开方式,请自行探索吧。

Hello World

Posted on 2018-08-10

Welcome to Hexo! This is your very first post. Check documentation for more info. If you get any problems when using Hexo, you can find the answer in troubleshooting or you can ask me on GitHub.

Quick Start

Create a new post

1
$ hexo new "My New Post"

More info: Writing

Run server

1
$ hexo server

More info: Server

Generate static files

1
$ hexo generate

More info: Generating

Deploy to remote sites

1
$ hexo deploy

More info: Deployment

Chen Jiancan

6 posts
3 categories
12 tags
Links
  • 酷壳(陈皓)
  • AaronSwartz
© 2018 Chen Jiancan
Powered by Hexo
|
Theme — NexT.Pisces v5.1.4